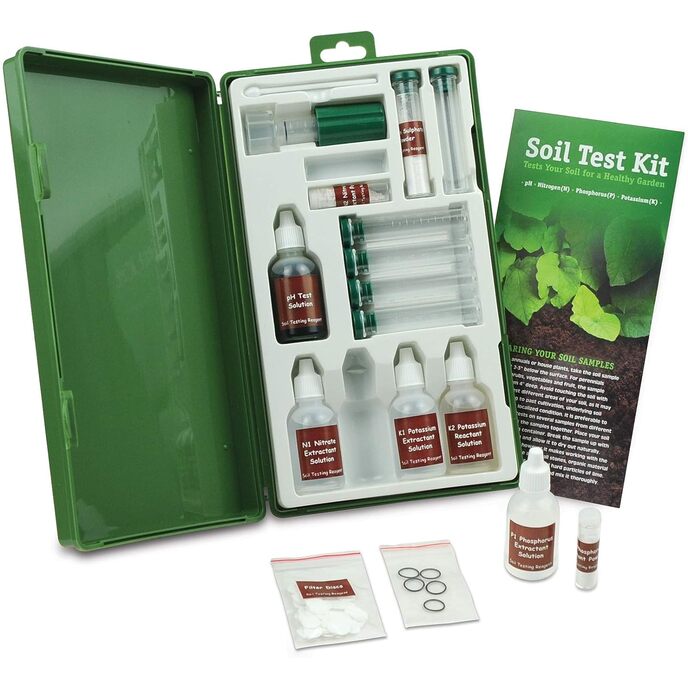
A detailed review of the 1662 version of the kit. I've started down the path of trying to grow a giant pumpkin. Since most growers indicate that soil conditions are very important, I bought this kit since it would also allow me to test other areas of the yard. I've never tested any of my soils, so it seemed like a good idea. I should add that I have a fairly strong science background and was a middle school teacher for 5 yrs. However, that doesn't make me a chemist *grin* so I'm not saying I'm and 'expert' in this area. Contents: The pictures shows the contents fairly well, but it should be added that the kit includes a very large amount filter discs - more than you could ever use -, as well as two replacement o-rings for the plunger. After doing several tests, the original o-ring was leaking liquid so the extras are a nice inclusion. The amount of reagents looks quite varied in how many tests you can complete. Most seem like you can do 20 or more, but the phosphorus reagent is getting low after perhaps a dozen tests. (My experiments with it may be the reason I am running out early - discussed below) Instructions: Contrary to other reviews, the instructions are clear but do require a careful read through. Their organization could be better however since I have made a few mistakes when testing. The mistakes were my own fault (not paying attention) however, and if you follow them closely you shouldn't have a problem. Techniques: The process for the tests require a dry crumbled soil. Get a soil sample 2-3 inches below the surface, and let it dry completely. Then I sifted it through a fine strainer to remove large particles and organic matter and then crushed the soil until it was a fine powder. Since there was still some fine gravel remaining after the crushing, I brushed them aside to get the finest soil particles. For testing, you add soil to the plunger device, add an extracting reagent, strain the liquid and then add a reaction agent. The exception is the pH test, and I found reading the result difficult without the straining. So I now conduct the test as instructed in the plunger tube, and then strain for the reading. Problems with the readings: The pH and Nitrogen tests are fairly easy to read. The phosphorus test however, seems difficult to interpret. The directions state to read the result immediately after adding the reagent. However, the color continues to change after a period of time and if I read it immediately it shows a zero result. Typically, a color changing reaction should be allowed to reach its final hue and I think leaving the test solution to sit until the color change is complete is the proper method for reading the phosphorus test. I can't say definitively that this is correct however. For the potassium test, the reagent creates a precipitate (cloudy particles) and reading the test seems almost impossible. The technique is to place the tube over a row of boxes with dots and moving from a high density of dots to the lower densities and stopping when you can just see a box through the tube. However, since the dots all have the same opacity, either you see them all, or you see none. Accuracy: I have not had my soil professionally tested, so I can't determine just how accurate the tests are. However, I have attempted to semi-calibrate the phosphorus and potassium tests to help me interpret the the soil results. pH - Once strained, the liquid color is easy to compare to the color chart - values range from 7.5 to 4.5 in .5 increments.. Straining is important however since suspended silts in the solution make interpreting the results very difficult. The instructions say wait for it to settle, but fine silt particles could take days (or longer!) to settle out. Nitrogen- The results color is easy to compare to the color chart. It should be noted that with further reading, a nitrogen test is always considered inaccurate since nitrogen levels can fluctuate in soils quickly. So consider the test to be an 'at this moment'. I still found it helpful. The color chart moves from 'surplus' to 'depleted' and so is basically a 'high - medium - low' test. *** For the phosphorus and potassium tests, I did a test sample by adding monopotassium phosphate to a soil sample. MPK is highly soluble and I basically over fertilized the test samples to just see what a 'very high' sample would look like. Phosphorus - This test is difficult to interpret as instructed. When the reagent is added, the instructions say to take the reading immediately. If you do so, the test will always read a zero result since the chemical reaction has not had time to take place. My MPK test should have been a deep purple (surplus) and it took a couple of minutes to match the color on the chart. My actual soil sample test finally reached a sufficient/adequate level after waiting a similar amount of time. The exact amount of time that produces an 'accurate' reading is unknown, but 'immediate' doesn't seem like a viable reading. The MPK test did start to change color very quickly but reading it immediately would have shown it to be near depleted. Potassium - This test is the least likely to produce any useful information. As mentioned above, it is basically an opacity test and using the chart, seeing 1 dot or 10 dots will be the same since they are the same size and pigment density. (The are all very black.) The MPK test created a very cloudy solution and obscured all of the boxes showing that there was a lot of precipitate in the solution, as would be expected. My own soil test produced very little to no precipitate showing it had no phosphorus (since I can see all the test result boxes). I find it hard to believe the soil has NO potassium in it. Basically this test should be considered a lot of potassium/very little potassium test. I might try to create my own test boxes with a grey scale (black to white) to see if I can make it more discriminating. I did a search online to look for a video review of this kit (none) as well as some reviews of it's results. Most information of meager value discusses the more simple versions of this kit and I don't feel they are comparable since this kit uses different testing methods. I did find a review however that compares a variety of test kits and compares them to a laboratory soil analysis. The article goes into detail on assessing accuracy, variation in results, and test results v.s. lab analysis. It does not however, indicate which RapidTest was used. Based on the level of detail the investigator put into the tests however, I think there is a chance he used this test kit. Saying that, he showed a very high accuracy for the test kit, and knowing the problems with the potassium test, this kit might not have been used. You can find the article here: http://horttech.ashspublications.org/content/17/3/358.full Just in case Amazon reviews don't allow for links, you can find the article by Googling the entire article title: Accuracy Varies for Commercially Available Soil Test Kits Analyzing Nitrate–Nitrogen, Phosphorus, Potassium, and pH If you find the article confusing (likely), looking at table 3 and 4 is easiest and most informative. Final Assessment: I think this kit is a 'fair' value (hence my three stars) since you can get a pH and Nitrogen test fairly accurately. The phosphorus test is more accurate if you deviate from the instructions and let the sample sit for a few minutes until the color change is complete. (My opinion of course.) I would like to do some more tests attempting to determine if the test reads a low value after sitting and might do so and return here with an update. The phosphorus test however is the lowest supply I have left in the kit, but this is partly due to me making some mistakes, as well as testing it a few times to sleuth out how it is best read. The potassium test should be considered completely useless unless a new density/opacity chart is created. It's design is baffling since I immediately questi